A Barbie cake is more than just a dessert it’s a centerpiece that brings excitement and joy to any celebration. Whether you’re making it for a child’s birthday, a themed party, or a special occasion, this cake turns a classic treat into an edible masterpiece. With a beautifully dressed Barbie doll at the center, the cake forms the shape of her gown, making it both delicious and visually stunning.
But how do you make a Barbie cake at home? In this guide, we’ll take you through every step from baking the cake layers to decorating the perfect ruffled dress. Whether you’re a beginner or an experienced baker, you’ll learn professional tips and techniques to make your Barbie cake look like it came straight from a bakery.
Table of Contents
What is a Barbie Cake? A Fun and Creative Dessert
A Barbie cake is a specially designed cake where a Barbie doll (or a similar fashion doll) is placed inside the cake, and the cake itself forms the shape of the doll’s dress. This type of cake is incredibly popular for kids’ birthdays, princess-themed parties, and even baby showers.
The main appeal of a Barbie cake is its customizability. You can create various themes and designs, such as:
- Classic pink princess Barbie cake
- Mermaid Barbie cake with ocean-themed decorations
- Fairy Barbie cake with floral and glittery elements
- Frozen-inspired Barbie cake using blue and white hues
No matter the theme, the key to a stunning Barbie cake is creativity and careful detailing in the decoration.
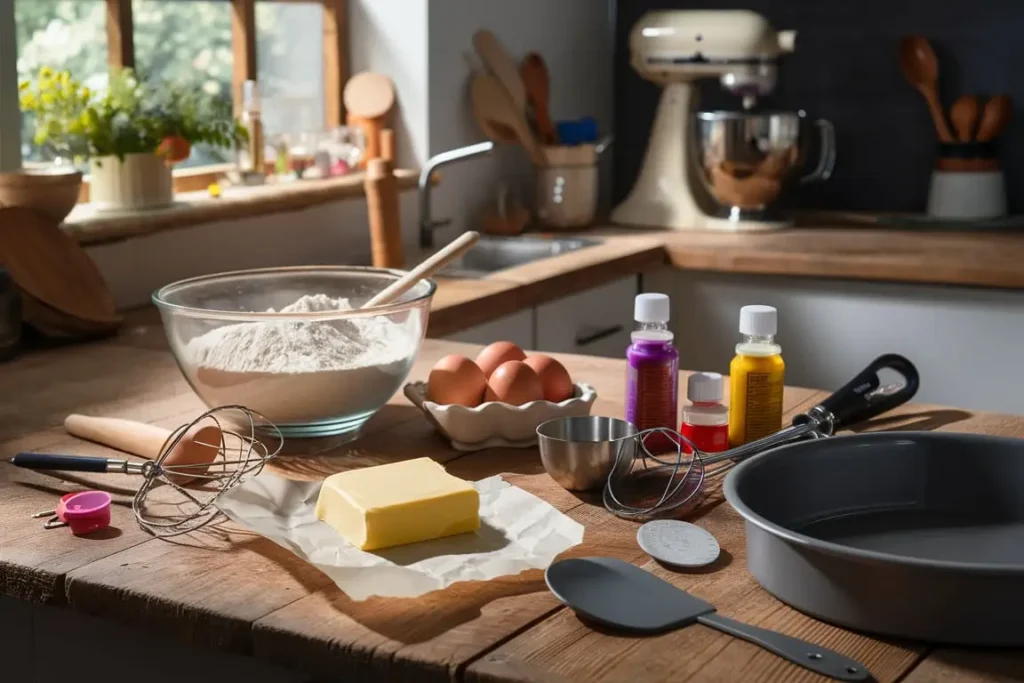
Ingredients You Need for a Perfect Barbie Cake
Before we start baking, let’s gather everything you need.
Cake Ingredients
To make the cake base, you can use any flavor you like. A vanilla sponge cake is a classic choice because it holds its shape well, but you can also opt for chocolate, red velvet, or lemon cake.
Here’s a basic ingredient list for a classic vanilla Barbie cake (serves about 10-12 people):
- 3 cups (360g) all-purpose flour
- 2 ½ tsp baking powder
- ½ tsp salt
- 1 cup (230g) unsalted butter, softened
- 2 cups (400g) granulated sugar
- 4 large eggs
- 1 tbsp vanilla extract
- 1 cup (240ml) whole milk
- ½ cup (120ml) sour cream (for added moisture)
Alternative Cake Flavors:
If you want a chocolate Barbie cake, simply replace ½ cup of flour with ½ cup of cocoa powder.
For a red velvet version, add 1 tbsp cocoa powder and 1 tsp red food coloring.
Buttercream or Fondant: Choosing the Right Decoration
Once the cake is baked and carved, you’ll need to frost and decorate it. The two most common options are:
- Buttercream frosting – Easier to work with, gives a soft and creamy texture.
- Fondant – Ideal for a smooth, professional look but requires skill to handle.
Basic Buttercream Frosting Recipe:
- 2 cups (460g) unsalted butter, softened
- 5 cups (600g) powdered sugar
- 2 tbsp heavy cream
- 1 tbsp vanilla extract
Beat the butter and sugar together until smooth, then add heavy cream and vanilla extract to achieve a fluffy consistency.
Tools and Equipment Required
To make the process easier, gather these essential tools:
A Barbie doll (or a similar-sized doll) – Wrapped in plastic wrap before placing in the cake. Mixing bowls and a hand mixer or stand mixer – For making the batter and frosting.
Measuring cups and spoons – Ensuring precise ingredient quantities.
Cake pans (8-inch or 9-inch round pans) – To bake the cake layers.
A dome-shaped oven-safe bowl – For the top part of the skirt.
A serrated knife – For carving the cake into a dome shape.
A turntable (optional) – Helps with smooth frosting application.
Piping bags and tips – To create decorative buttercream details.
Food coloring gels – To customize the cake’s color theme.
Cake board or serving platter – For easy presentation.
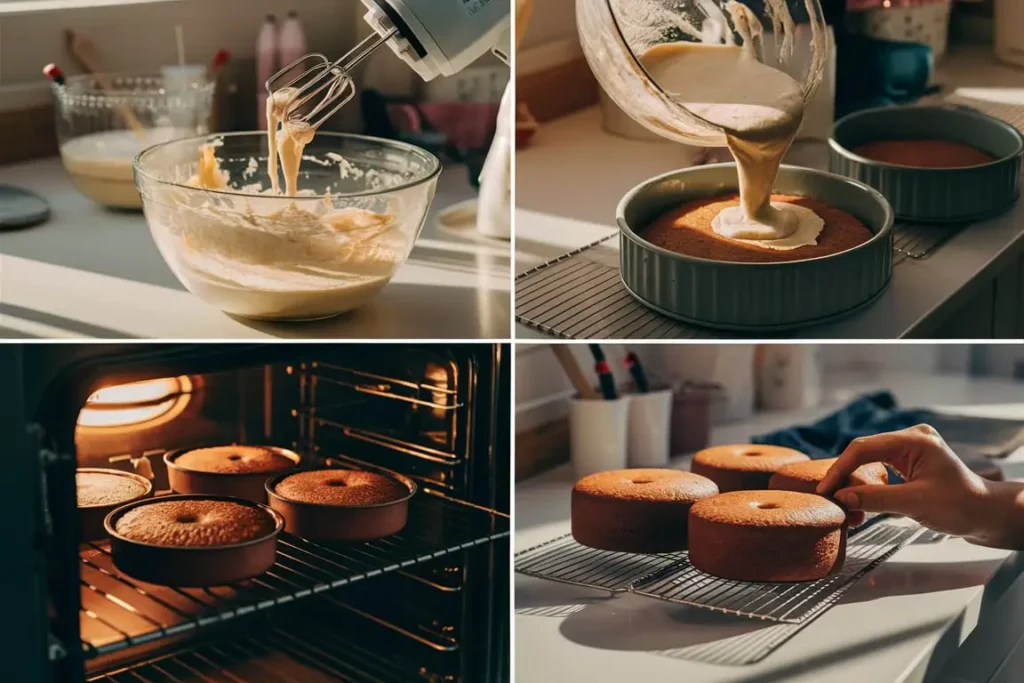
Step-by-Step Guide: Baking the Cake Base
Now that you have your ingredients and tools ready, let’s bake the cake.
Step 1: Choosing the Right Cake Recipe
Since the cake will serve as the Barbie’s skirt, it needs to be sturdy yet moist. Vanilla, chocolate, or red velvet are excellent choices.
A dense cake (like pound cake) holds up better than a soft sponge. If using a box mix, consider adding an extra egg and replacing water with milk to improve texture.
Step 2: Mixing and Baking Instructions
Preheat the oven to 350°F (175°C). Grease and line your cake pans.
In a bowl, whisk together the flour, baking powder, and salt.
In another large bowl, beat the butter and sugar until light and fluffy (about 2 minutes).
Add eggs one at a time, mixing well after each addition. Stir in the vanilla extract.
Alternate adding flour mixture and milk, mixing on low speed until combined.
Divide the batter evenly between 2-3 round cake pans and a dome-shaped bowl.
Bake for 30-35 minutes, or until a toothpick inserted in the center comes out clean.
Cool the cakes completely before moving to the next step.
Step 3: Cooling and Preparing for Decoration
Once the cakes are baked:
Allow them to cool in the pans for 10 minutes, then transfer to a wire rack.
Wrap them in plastic wrap and refrigerate for at least 1 hour. This makes carving easier.
Trim the tops if needed to create even layers.
At this stage, your cakes are ready for assembly and decoration.
Carving and Assembling the Barbie Cake
Now that our cake layers are baked and cooled, it’s time to assemble and shape the cake into Barbie’s skirt.
Step 1: Shaping the Skirt – Carving the Cake Layers
To create the perfect dome-shaped dress, follow these steps:
Stack the cake layers on top of each other with a thin layer of buttercream in between.
Use a serrated knife to gently carve the edges, making a smooth, rounded skirt shape.
If you’ve baked a dome-shaped cake in an oven-safe bowl, place it on top as the final layer.
Test-fit your Barbie doll by wrapping its lower half in plastic wrap and inserting it into the center.
If needed, cut out a small cylindrical hole in the middle to insert the doll securely.
Tip: Always carve gradually to avoid over-cutting. A slight slope from top to bottom creates a more natural gown shape.
Step 2: Placing the Barbie Doll Inside the Cake
Once your cake is shaped:
Wrap Barbie’s lower half in plastic wrap to keep it clean.
Gently insert the doll into the center hole.
If the cake is too tall, trim the base slightly for better proportion.
If the doll doesn’t stay upright, add extra buttercream or cake pieces around the hole for support.
Step 3: Applying a Crumb Coat for a Smooth Finish
Before decorating, we need to apply a crumb coat a thin layer of frosting that traps loose crumbs and makes the final decoration smooth.
Spread a thin layer of buttercream over the entire cake using an offset spatula.
Smooth it out with a cake scraper, filling in any gaps.
Chill the cake in the fridge for 15–30 minutes to firm up before final decorating.
A cold cake is easier to decorate because the buttercream sets, preventing crumbs from mixing into the final layer.
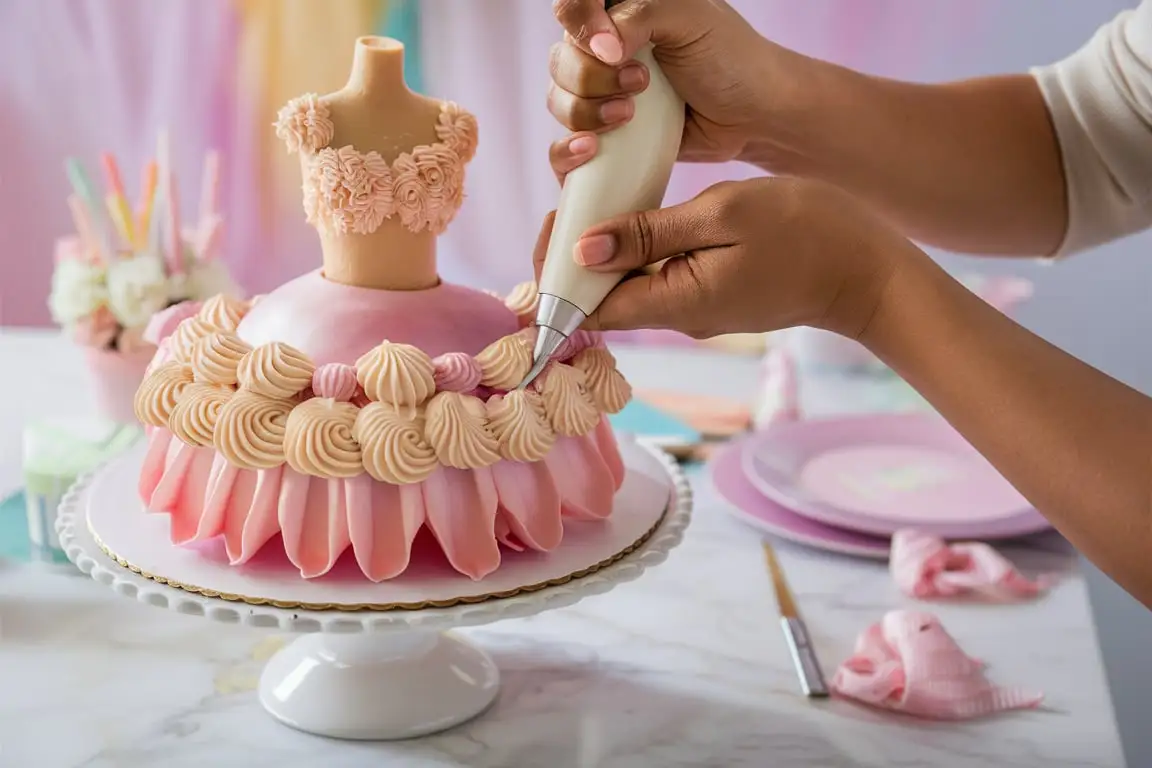
Decorating the Barbie Cake: Frosting and Design Ideas
Now comes the fun part decorating the cake to resemble a beautiful Barbie dress!
Step 1: Choosing the Right Frosting
You can decorate using either:
- Buttercream frosting – Soft, creamy, and easy to pipe.
- Fondant – Creates a smooth, professional look but requires practice to handle.
For beginners, buttercream is the easiest option, while fondant works best for intricate details.
Step 2: Creating Ruffles, Rosettes, and Patterns
Buttercream Techniques:
Use a star piping tip to create rosettes and ruffles on the skirt.
Pipe vertical ruffles for a dramatic layered effect.
Blend different shades of pink or pastel colors for an ombré look.
Fondant Decoration:
Roll out thin sheets of fondant and drape them to form flowing skirt layers.
Use cookie cutters to create floral or lace patterns.
Add a fondant bow or pearls to enhance elegance.
Experiment with textures you can combine buttercream piping and fondant details for a unique effect.
Step 3: Adding Edible Decorations – Pearls, Glitter, and More
Enhance the Barbie cake’s elegance with edible embellishments:
Edible glitter or shimmer dust for a princess-like sparkle.
Sugar pearls or sprinkles to mimic jewelry.
Piped buttercream flowers for a fairy-tale touch.
Less is more stick to a cohesive color scheme to keep the cake looking sophisticated.
Color and Theme Ideas for Your Barbie Cake
Personalizing your Barbie cake with creative themes makes it even more special!
1. Classic Pink Princess Barbie Cake
- Pink rosettes piped with buttercream.
- Gold accents and edible pearls for a royal touch.
- A tiara or edible bow as a final detail.
2. Themed Barbie Cakes – Mermaid, Fairy, and More
- Mermaid Barbie Cake – Use blue and teal ombré frosting with seashell decorations.
- Fairy Barbie Cake – Add sugar flowers, butterflies, and pastel hues.
- Frozen Barbie Cake – Use white and blue frosting with edible snowflakes.
3. Customizing for Different Occasions
- Baby Shower Barbie Cake – Soft pastel colors with a floral touch.
- Bridal Shower Barbie Cake – Elegant white fondant with lace detailing.
Match the Barbie doll’s outfit with the cake’s color theme for a seamless look.
Common Mistakes to Avoid When Making a Barbie Cake
Even experienced bakers face challenges. Here’s how to avoid common pitfalls:
Cake isn’t stable and collapses → Use a dense cake recipe and refrigerate before decorating.
Buttercream looks uneven → Apply a crumb coat first and smooth it out properly.
Fondant cracks or tears → Knead fondant well and roll it out evenly before covering the cake.
Doll falls over inside the cake → Carve a snug hole and secure the doll with extra buttercream if needed.
Patience is key always take your time with each step!
Pro Tips for a Professional-Looking Barbie Cake
Use gel food coloring instead of liquid for vibrant, non-watery colors.
Chill the cake between steps to keep frosting firm and easier to handle.
Use a piping practice board before decorating the actual cake.
Take photos in good lighting to capture the cake’s beauty for memories (or social media!).
Frequently Asked Questions (FAQs)
Can I Use a Real Barbie Doll in the Cake?
Yes! Just wrap the doll’s lower half in plastic wrap or cling film before inserting it into the cake.
How Long Does a Barbie Cake Stay Fresh?
A Barbie cake lasts up to 3 days at room temperature or up to 5 days in the refrigerator. Always store it in an airtight container.
Can I Make a Barbie Cake Without Fondant?
Absolutely! You can use buttercream frosting to achieve ruffles, rosettes, and ombré effects without fondant.
What Is the Best Cake Flavor for a Barbie Cake?
Vanilla and chocolate are popular choices, but red velvet and strawberry cakes also work beautifully.
Conclusion: Bringing Your Barbie Cake to Life
Making a Barbie cake is a fun and creative way to celebrate special occasions. With the right ingredients, techniques, and a little patience, you can create a cake that’s both stunning and delicious.
Now that you know how to bake, carve, and decorate a Barbie cake, it’s time to put your skills to the test. Whether you choose buttercream ruffles, fondant elegance, or themed designs, the possibilities are endless.
Ready to wow your guests? Get baking and make your dream Barbie cake today!
Barbie Cake
Equipment
- Mixing Bowls
- Hand Mixer or Stand Mixer
- Measuring Cups and Spoons
- 8-inch or 9-inch Cake Pans
- Dome-shaped Oven-Safe Bowl
- Serrated Knife
- Turntable (Optional)
- Piping Bags and Tips
- Food Coloring Gel
- Cake Board or Serving Platter
- Barbie Doll (Wrapped in Plastic Wrap)
Ingredients
Vanilla Cake Base
- 3 cups all-purpose flour
- 2 1/2 tsp baking powder
- 1/2 tsp salt
- 1 cup unsalted butter softened
- 2 cups granulated sugar
- 4 large eggs
- 1 tbsp vanilla extract
- 1 cup whole milk
- 1/2 cup sour cream for added moisture
Buttercream Frosting
- 2 cups unsalted butter softened
- 5 cups powdered sugar
- 2 tbsp heavy cream
- 1 tbsp vanilla extract
- few drops food coloring gel pink or preferred color
Instructions
- Preheat the oven to 350°F (175°C) and grease your cake pans and dome-shaped bowl.
- In a bowl, whisk together flour, baking powder, and salt.
- In a separate large bowl, beat butter and sugar until light and fluffy.
- Add eggs one at a time, mixing well after each addition, then stir in the vanilla extract.
- Alternately add dry ingredients and milk, mixing until combined. Stir in sour cream for moisture.
- Divide the batter evenly into 2-3 round cake pans and a dome-shaped bowl. Bake for 30-35 minutes until a toothpick inserted comes out clean.
- Let cakes cool in the pans for 10 minutes, then transfer to a wire rack to cool completely. Wrap in plastic and chill for 1 hour.
- To prepare the buttercream, beat butter and powdered sugar together until smooth, then add heavy cream and vanilla extract. Mix until fluffy. Add food coloring and blend.
- Stack cake layers with buttercream between them, carving gently to create a skirt shape. Place the dome layer on top.
- Wrap Barbie’s lower half in plastic wrap and insert her into the center of the cake.
- Apply a thin crumb coat of frosting and chill for 30 minutes to set.
- Decorate the cake using piping bags to create ruffles, rosettes, or fondant drapes.
- Add final embellishments such as edible glitter, pearls, or additional fondant decorations.
- Serve and enjoy your stunning Barbie cake!